Error handling in EVA Netmodeler
EVA Netmodeler Error Handling has the following features:
- Allows the System Administrator to turn Walkback logging on or off for the system as a whole.
- Allows the System Administrator to automatically cause Archi to truncate the Walkback log once it reaches a certain size.
- Allows the System Administrator to exclude certain errors from logging a Walkback, or to cause "light" logging of selected errors.
- Allows the user to view the walkback for a certain error in the browser, provided it has created a walkback.
- Allows the System Administrator to trap the Archi Error Event and cause it to fire of a set of standard Archi Events, typically to e-mail the walkback log to a designated user or group of users.
This section covers each feature in turn and provides a step by step guide to configuring each separate feature.
Switching Walkback Logging On or Off for EVA Netmodeler as a whole.
This feature is useful on a very slow server with a high volume of users, if it is felt that the performance penalty for logging walkbacks is too high and impacting productivity or user response.
The installation of this feature is relatively simple:
In the Item Browser, select the "ArchieSystemSettings" type and click on the "new" button. Create a new system setting with a name of "DoWalkBack" if one does not exist or use the existing one, and set the value of the "Setting
Value" property to "YES".
This will tell EVA Netmodeler to perform Walkbacks, if the "Setting value" property for this setting is changed to "NO", EVA Netmodeler will not perform walkbacks when errors are encountered.
The illustration below shows the proper definition of the "DoWalkBack" setting:
Automatically truncating the Walkback Log
Apart from disabling walkbacks as a whole, system performance can be improved by periodically truncating the Walkback.log file. EVA Netmodeler
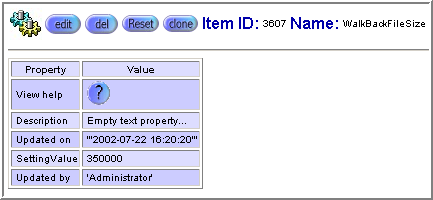
now allows the System Administrator to set this up automatically by simply creating a new "ArchieSystemSetting" instance called "WalkBackFileSize" and specifying the maximum file size desired in the
"SettingValue" property in bytes.
For example, if the value of the "Setting Value" property for this setting is "1000000", and the actual size of the Walkback.log file exceeds or equals this value, EVA Netmodeler
will rename the old Walkback.log file to "Walkback (<<timestamp>>).log" and create a new Walkback.log file before logging the next Walkback encountered.
The illustration below shows the proper definition of the "WalkBackFileSize" setting:
Excluding errors from the Walkback log or "Light Logging"
A more sophisticated method of handling walkbacks is to either exclude certain selected errors from producing a
walkback or to allow them to be written to the walkback log as "light" logs (i.e. The occurrence of the error is logged, but EVA Netmodeler doesn't dump the entire Smalltalk stack into the log file when the error occurs).
The process of installing this feature is a bit more time-consuming, and will be dealt with in several steps:
Step1 – Create the Archi Error Excl type
First we need to create a type in EVA Netmodeler, the instances of which will represent errors we would like to either exclude from logging or to perform light logging only.
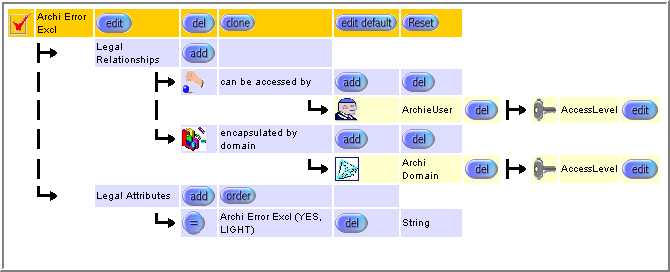
In the Type Maintenance Browser, first create a new named property with the name "Archi Error Excl", and put "YES, LIGHT" in the Unit of Measure field.
Now create a new type called "Archi Error Excl" and add the new property as a legal attribute.
When you are finished, your new type should resemble the illustration below:
Step 2 – Create a setting to tell Archi to use the new type
Now you need to create a new "ArchieSystemSetting" that will tell EVA Netmodeler which type defines error exclusions.
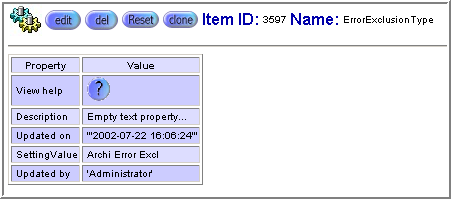
In the Item Browser, create a new setting called "ErrorExclusionType" and set the value of the "SettingValue" property equal to "Archi Error Excl". This will tell EVA Netmodeler
to look for instances of this type and treat them as special conditions whenever an error occurs.
The illustration below shows the proper definition of the "ErrorExclusionType" setting:
Step 3 – Setting up Error Exclusion Refresh Events
Obviously, whenever we create a new instance of "Archi Error Excl", we want EVA Netmodeler to be aware that we have changed the error exclusion set and to refresh its knowledge of this set.
In order to do this, we need to subscribe to every Create, Edit and Delete event for this type and fire off an action that will cause EVA Netmodeler to refresh its knowledge of the error exclusion set.
The following needs to be in place before this will work:
Create a new "Action Type" lookupitem.
- On the Item Browser, select "LookupType" from the dropdown box, then select "Action Type" from the list box that appears.
- On the bottom-left pane, click on the "new" button next to the "includes" relationship.
- Complete the form that appears automatically on the bottom-right pane by typing "Refresh Error Exclusions" in the Item Name field and "LOADERROREXCLUSIONS" in the LookupValue field, then click on "SUBMIT"
- The new lookupitem will be added to your "Action Type" list
Create a new "Event Action"
- On the Item Browser, select "EventAction" from the dropdown box, then click on the "new" button.
- Complete the form that appears automatically on the top-right pane by typing "Refresh Error Exclusions" in the
Item Name field and selecting "Refresh Error Exclusions" from the dropdown box that appears in the "Perform this action" field, then click on "CREATE"
- The new Event Action will be created and the Item Browser will automatically focus on that item.
Create a new "Event Subscription"
- The Item Browser must be focused on your new Event Action called "Refresh Error Exclusions". On the bottom left-hand pane, click on the "new" button next to the "belongs to" relationship.
- A form will be displayed on the Bottom-Right hand pane, complete this form by entering "Archi Error Excl New" in
the "Item Name" field, and selecting "1. Create" from the "Subscribe to Event" dropdown box. Finally, enter "Archi Error Excl" in the "On Node Type" field. Now click on the "SUBMIT" button to create the new subscription.
- Repeat the process for "Archi Error Excl Delete" and "Archi Error Excl Edit", be sure to select the "3. Delete" and "2. Edit" options in the "Subscribe to Event" dropdown respectively.
- When you are done, you should have three event subscriptions, all performing the event action created during this process.
Step 4 -Setting up the Actual Error Exclusion Instances
So far we have set up the infrastructure needed by EVA Netmodeler to manage and automatically refresh its error exclusion set whenever a change occurs to the Archi Error Excl instances.
Now we can create some instances of errors we would like to exclude for logging or to perform light logging.
Lets assume, for example, that we often get an error containing the text "UndefinedObject does not understand sffdfdsfdfsfs", we would like this error to be excluded from logging.
In the Item Browser, select "Archi Error Excl" from the dropdown on the top-left pane and click on the "new" button.
The top-right pane will display a form. Complete this form by entering the identifying text of this error in the "Item Name" field, in this case you would type "UndefinedObject does not understand sffdfdsfdfsfs".

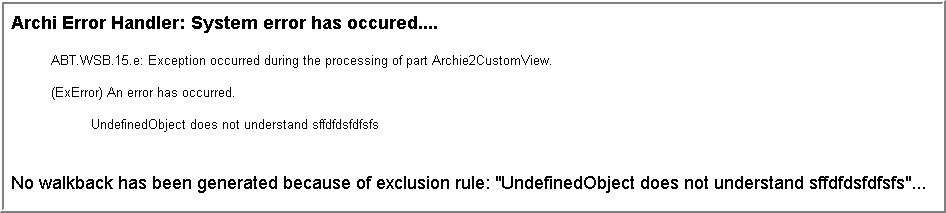
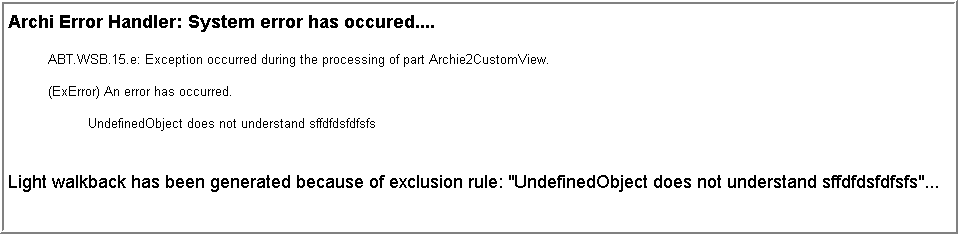
In the "Archi Error Excl" field, type "YES" to exclude this error from logging. Now click on the "Create" button. Your new instance should resemble the illustration below:
When this error occurs, EVA Netmodeler will show it on the browser, but it will not be logged in the Walkback.log file. The illustration below shows how EVA Netmodeler will now report the error:
To enable light logging, edit the instance of "Archi Error Excl" you have just created and change the value of the "Archi Error Excl" property to "LIGHT" then hit "Submit".
Now, when the error occurs, Archi will log the minimum of information in the Walkback.log file and the error will be reported as follows:
Viewing a Walkback on-screen.
EVA Netmodeler now also allows a user to view a walkback on-screen. After a walkback has been generated, EVA Netmodeler keeps it in memory for a while. During this time, the user may view the walkback on-screen.
To see how this works, change the "Archi Error Excl" field of the instance created in the previous step from "LIGHT" to "NO".
Whenever this error now occurs, EVA Netmodeler will produce a full walkback as normal, the error will be reported as follows:
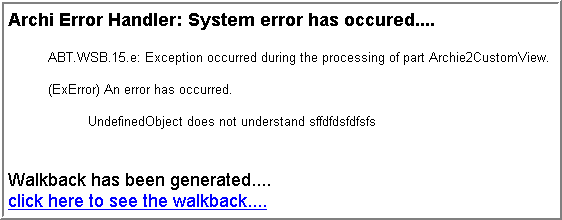
As you can see, EVA Netmodeler has generated a hyperlink, by clicking on this link, the user will be able to view the full walkback in the browser.
E-mailing Walkbacks to a designated user or user group
Because of the more sophisticated error handling, EVA Netmodeler now allows us to subscribe to the Error Event and
perform Event Actions against it. Typically a desired action is to email the walkback to a User or Group of users. This section explains how to install this feature.
Step1 – Make sure your SMTP settings are valid
There are two important setting to consider, the one is "SMPTServerName", the value of this setting should be the name of a valid SMTP server that is visible to the EVA Netmodeler Server Application.
The second setting is "NotificationSender", the value of this setting should be a valid email address that will be used as the sender of all notifications from EVA Netmodeler
. Make sure that your SMTP server will be happy forwarding messages arising from this email address.
Step2 - Create an "Event Type" lookupitem for Error events.
Next we have to create an "Event Type" lookupitem for our new error events:
- On the Item Browser, select "LookupType" from the dropdown box, then select "Event Type" from the list box that appears.
- On the bottom-left pane, click on the "new" button next to the "includes" relationship.
- Complete the form that appears automatically on the bottom-right pane by typing "9. Error Event" in the Item Name field and "ERROR" in the LookupValue field, then click on "SUBMIT"
- The new lookupitem will be added to your "Event Type" list
Step 3 - Create a new "Event Action"
Now we have to create an "Event Action" that will be executed whenever the error event type occurs:
- On the Item Browser, select "EventAction" from the dropdown box, then click on the "new" button.
- Complete the form that appears automatically on the top-right pane by typing "e-mail Administrator" in the "Item Name" field and selecting "e-Mail" from the dropdown box that appears in the "Perform this action" field.
Now complete the "Action Keywords" field by typing the following: "NT:ArchieUser;NI:Administrator;ATT:e-mail address" , then click on "CREATE"
The keywords basically tells the email Event Action Servicing routine where to find the e-mail address (e.g. Go to NodeType "ArchiUser", Node I
nstance "Administrator" and use the value of ATTribute "e-mail address"
- The new EvenAction will be created and the Item Browser will automatically focus on that item.
Step 4 - Create a new "Event Subscription"
The Item Browser must be focused on your new Event Action called "e-mail Administrator". On the bottom left-hand pane, click on the "new" button next to the "belongs to" relationship.
A form will be displayed on the Bottom-Right hand pane, complete this form by entering "Error Event Subscription" in the
"Item Name" field, and selecting "9. Error Event" from the "Subscribe to Event" dropdown box. Finally, leave the "On
Node Type" field blank to indicate that this event must be fired irrespective of type. Now click on the "SUBMIT" button to create the new subscription.
All things being equal, whenever EVA Netmodeler now logs an error, the new error event will be fired and all associated subscription/action groups will be executed. In this case the EVA Netmodeler
Administrator will receive an e-mail notification containing the walkback text.
To include more users in the reception list, simply follow step 3 above for every additional user and link the resultant "Event Action" instance to the "Event Subscription" created in step 4 above
|
