Generic Item Display & Edit (GIDE) Browser
The GIDE Browser is a generic interface for viewing, capturing, editing and linking content in the repository. It presents the user with the source
item, target item and info node data in a single screen with the ability to toggle between these viewing options. This allows the user to define the
amount of visible data to be viewed at a given time and also makes good use of available screen space.
This section will cover the following topics:
GIDE Panes
GIDE is available as the right hand two panes of the Item Tree Browser; as a drill down on items from other browsers (normally by selecting the
item's (=) button or the link for the item); as a drill down from the report browser and generated web pages, and as a stand alone interface in
anonymous mode or when using the (+) button to add an item to the repository without losing currency (focus of type/item/browser). Finally,
GIDE is integrated with the Graphical Modeler as the right hand pane, where item details can be displayed, edited linked etc.
The GIDE browser has three viewing settings: the source pane, the target pane and both panes. These may be selected using the "book" icons.

The selected option is shown highlighted in yellow. The left one selects viewing the source item only, the right the target item only and the centre
one both items side by side.
Source Pane
The source pane consists of the properties of a given item and its relationships to other items.

Above the property data is a button strip, which provides various functions the user can perform with the focus item. Note that only those
functions which the user has the rights to perform on the selected type of item will be displayed.
 Allows the user to edit the properties of the item Allows the user to edit the properties of the item
 Performs a logical delete of the item in the repository Performs a logical delete of the item in the repository
 Resets the item's properties to default values. The defaults are displayed, allowing user to select which properties Resets the item's properties to default values. The defaults are displayed, allowing user to select which properties
to reset
 Creates a duplicate instance of the currently selected item (including properties and relationships) but with a new name Creates a duplicate instance of the currently selected item (including properties and relationships) but with a new name
 Launches the documentor browser. This provides details of the focus item's properties and similar information for Launches the documentor browser. This provides details of the focus item's properties and similar information for
all items directly related to the current item
 Allows the user to edit the meta data definition of the currently selected type Allows the user to edit the meta data definition of the currently selected type
 Launches a table view of all the target items of the currently selected item in the right hand pane Launches a table view of all the target items of the currently selected item in the right hand pane
 Creates a version of the currently selected item. This is effectively a clone, with a date and time stamp Creates a version of the currently selected item. This is effectively a clone, with a date and time stamp
appended to the name of the older version and a earlier|later relationship between the versions
|
When the mouse pointer hovers next to a target type header, the following buttons are displayed:
|
 Allows the user to view related items in a table. Allows the user to view related items in a table.
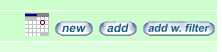
 Creates and links a new item of the target type to the currently selected item Creates and links a new item of the target type to the currently selected item
 Links an existing item of the target type to the currently selected item Links an existing item of the target type to the currently selected item
 Links an existing item of the target type, matching criteria specified by the user in the selection dialogue, to the
currently selected item Links an existing item of the target type, matching criteria specified by the user in the selection dialogue, to the
currently selected item
|
|
When the mouse pointer hovers next to a specific target item, the following buttons are displayed:

|
 Displays the target item's properties in the target pane. Displays the target item's properties in the target pane.
 Performs a logical delete of the link between the focus item and the target item. Performs a logical delete of the link between the focus item and the target item.
|
Target Pane
The target pane shows a number of different screens depending on what has been selected.
When the property button (=) of an item is pressed in the source pane, all the property and related item details as well as any info node details,
if any, are displayed in the target pane. If this is the case, the top section of the pane displays the info node details and the bottom
section displays the details of the selected item. If there are no info nodes then only the details of the selected item is displayed.

The info node section has a set of buttons:
|
Allows the user to edit the properties of the item
Resets the properties of the item to default values.
 Changes focus to the selected item, making it the item displayed in the source (left) pane Changes focus to the selected item, making it the item displayed in the source (left) pane
Allows the user to edit the meta data definition of the currently selected type
|
As with the info node, the related item also has a set of buttons. These are basically the same as the source node buttons minus the doc and
the
buttons.
Both Panes
When both panes are selected, the source pane and the target pane are displayed together as shown below.

GIDE Buttons
Some of the buttons launch new screens in the browser.
The edit button will launch a new screen within the currently selected workspace (the edit screen will be displayed in the pane from where it is
launched). The user is able to edit the existing item properties.

When the del button is pressed, a confirmation box is displayed. On confirmation of the deletion, a logical deletion of the item is performed.
The reset button will launch the reset screen in the currently selected workspace. The user is able to select which properties to reset to their
default values by checking the relevant check boxes.

The clone button makes a copy of the currently selected item.

The doc button lauches the Documentor browser where all the properties of the current item and related item details are displayed.
This allows the user to select a type and an instance of that type and be able to generate the display.

The edit type button launches the Type browser with the currently selected type.

The table button displays all related items as a table view in the target pane. From within the Table view in the Target Pane, the CSV button
reproduces the table details in a comma separated variable (CSV) format text file suitable for import into a spreadsheet.

The ver button creates and stores a version of the currently selected item. The older version will have the same name with a date and time
stamp appended. The versions will be linked with an earlier|later relationship. Initially their contents are identical, but the later version can
subsequently be modified.

Working with Relationships between the Source Item and Target Items
To link an item to the current item:
- Ensure the source item is focussed in the left hand pane
- Identify the kind of relationship and the kind of target item you want to link
- Move the mouse cursor over the appropriate line in the relationships area of the source pane
- Use the
- NEW button to create a new target item of the designated type and link it to the current item using the chosen relationship
- ADD button to show a list of available items of the chosen type and link one or more of them to the source item using the chosen relationship
- ADD WITH FILTER button to specify a filter/match condition to assist with selection of items to link to the current item
To unlink an item from the current item:
- Select the DEL button next to the appropriate relationship and target item
Linking using NEW
If you use the new button next to a relationship name and there is only one kind of allowed target type, then you will immediately get a capture
screen for the relevant type to capture the properties for the new item. If there are multiple target types for this relationship type, then you will
be prompted to select a legal type, then presented with the capture screen.
If you use the NEW button next to a target type within a relationship name, you will immediately be presented with a capture screen for an item
of the designated target type.
Linking using ADD
If you use the add button next to a relationship name, you will be presented with a list of all items of all legal target types for that relationship.
This may be a very long list. Use check boxes in the presented list and then submit to link one or more items.
If you use the add button next to a target type within a relationship name, you will be presented with a list of all items of the selected target type
only. Use check boxes in the presented list and then submit to link one or more items.
Linking using ADD WITH FILTER
If the list of target items using the add button would be too long, you can filter the list to show only more appropriate items by using this button.
If you use the add w. filter button next to a relationship name, you will be presented with a list of the legal target types and the opportunity to
enter a filter condition per type.
If you use the add w. filter button next to a target type within a relationship name, you will be presented with a dialogue to enter a filter condition
for the selected type only.
Once you have entered your match string in the filter condition box, submitting will display a list of the target items matching your filter
conditions. The provided string will be found anywhere in the item names and in any case. Use the check boxes and submit to link the selected
items using the chosen relationship.
|