Using the Visual Modeling Interface in Visio
This section describes how to use the EVA Netmodeler Visual Modeling Interface using Microsoft Visio as the visual modeling client.
Refer to the Visual Modeler Interface section for an overview of this facility and information on how to install and configure the facility.
This section assumes that you have
- a Visio diagram file that contains the correct stencil and macros to work with the EVA Netmodeler Visual Modeling Interface
- an appropriately configured EVA Netmodeler server that contains the correct meta data and access rights for the models being built
Creating a new model in Visio
Create a new blank document in Visio and prepare the document for use with the EVA Netmodeler Visual Modeling Interface as described in the Visual Modeler Administration section.
You can now create the new diagram using the master shapes from the diagram stencil. The master shape names will become the node types in EVA Netmodeler, and labels of the shapes placed on
the diagram will become the names of items in EVA Netmodeler. If you place shapes on your diagram that already have a representation in the EVA Netmodeler repository, be sure to give the shapes the identical names to the items
that you are re-using from the repository. Any items on the diagram that have different names to the items already in the repository will be treated as new items and created in the repository when the diagram gets saved.
Sending a model to EVA Netmodeler
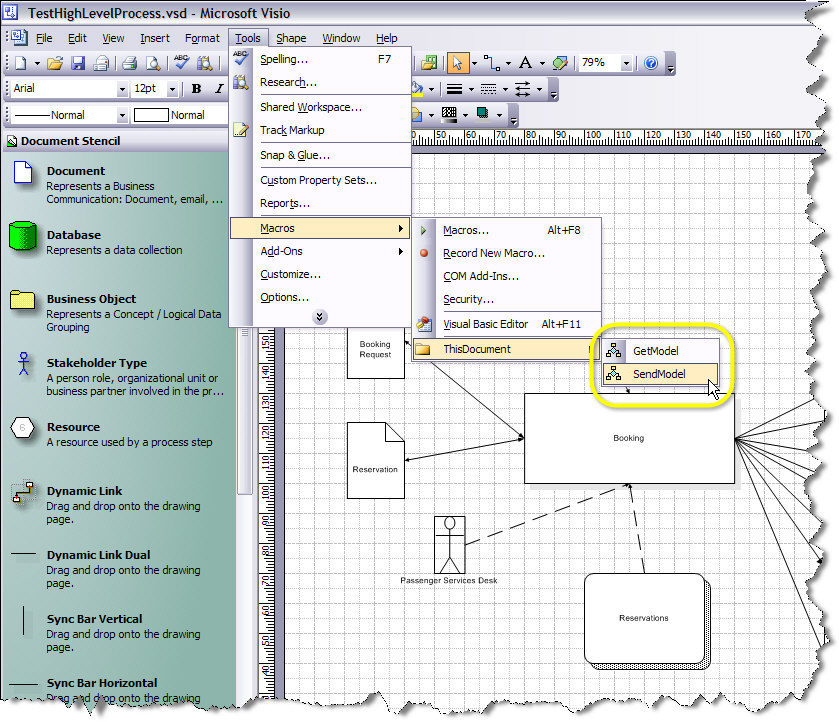
When you have completed the model diagram, select "SendModel" from the "Tool\ Macro\ This Document" menu.

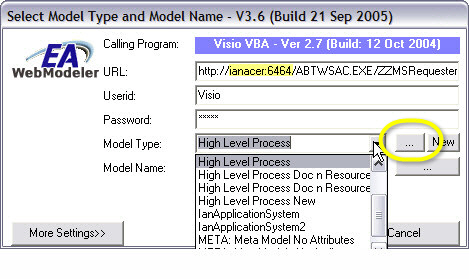
This will open the dialog shown below

Ensure that the server URL is correct for your environment. The highlighted portion of the URL shown above must be replaced with the details for your EVA Netmodeler server.
Provide your EVA Netmodeler User id and Password. These are stored securely on the workstation as defaults for future use.
Select the appropriate Model Type from the drop-down lists. If necessary, select the
 button on the right of the list box to get a list of Model Types from the server. You must be sure to select the model type that corresponds to
the stencil that you used to create the diagram. The diagram will not be saved correctly if the shapes on the diagram (created from the masters in the stencil) do not match the model type definition. button on the right of the list box to get a list of Model Types from the server. You must be sure to select the model type that corresponds to
the stencil that you used to create the diagram. The diagram will not be saved correctly if the shapes on the diagram (created from the masters in the stencil) do not match the model type definition.
Provide a new name for the model in the list box.
Leave the Send Attributes and Retrieve Only Own Relatinoships un-checked, and select OK
A progress window similar to the one shown here will display the progress of the Send Model process after you select the OK button.
When the Operation completed message appears, scroll through the messages in the dialog to confirm that no errors
occurred during the Send Model process. Errors usually relate to mismatches between the shapes in the Visio stencil and the Model Type definition in EVA Netmodeler.
Select the Close button when you have completed your review of the Send Model messages.
You may also save the Visio diagram on your workstation or file server. Optionally, you can upload the Visio version of
the diagram to the External Tool Model property of the appropriate Model item in EVA Netmodeler.
Getting a model from EVA Netmodeler
Open the stencil of the type of model you are going to edit. Note that if you do not have the correct stencil open when Visio retrieves the model from EVA Netmodeler
, Visio will not display the model correctly.
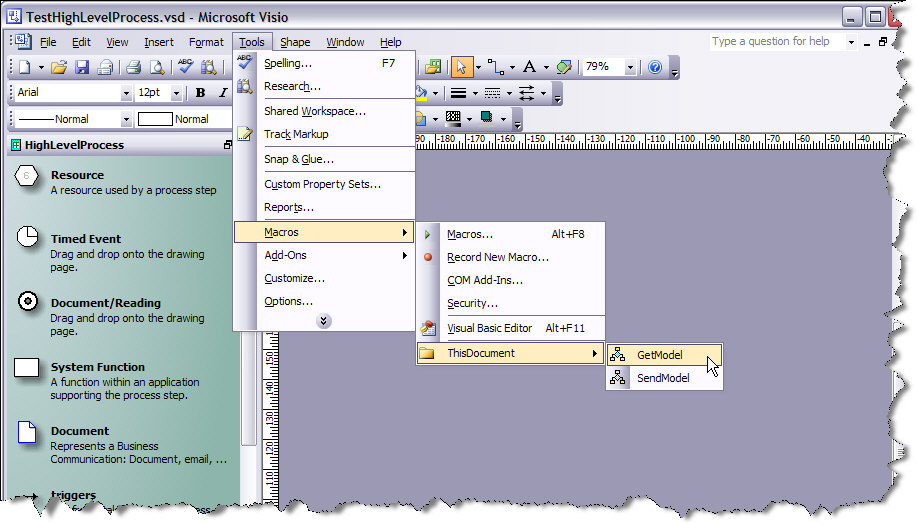
Under the "Tool" menu, choose "Macro", "This Document", "Get Model".

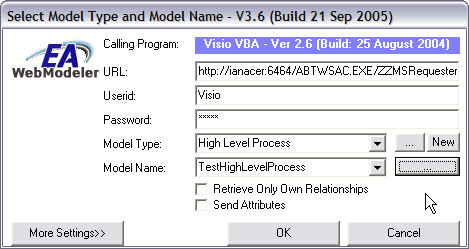
This will open the dialog shown below

Ensure that the server URL is correct for your environment. The highlighted portion of the URL shown above must be replaced with the details for your EVA Netmodeler server.
Provide your EVA Netmodeler User id and Password. These are stored securely on the workstation as defaults for future use.
Select the appropriate Model Type and Model from the drop-down lists. If necessary, select the
 button on the right of the list box to get a list of Model Types or Models from the server. button on the right of the list box to get a list of Model Types or Models from the server.

Often you will want to update a diagram with new information that is available in the repository (possibly captured
through the web interface or data import utility). By default, Visio will retrieve this new information and include it on the
diagram. However, there are times when you want to preserve the diagram as it was when you last saved it. For example, if you have a diagram that represents a particular point in time, you don't want it to change when new
information becomes available - you probably want to create a new one with the updated information to reflect a new point in time.
Check the Retrieve Only Own Relationships
box to have Visio retrieve only those relationships that were on the diagram when it was last saved. If this option is not checked (default), Visio will retrieve all the relationships that exist in
the repository and that are of a type defined in the model type / stencil.
Leave Send Attributes un-checked, and select OK
A progress window similar to the one shown here will display the progress of the Get Model process after you select the OK button.
Select the Close button when the Operation completed message appears.
The retrieved model should now be displayed in the Visio Diagram pane.
Please note the following:
- Get Model is an additive process i.e. it will add items retrieved from the server that were not already on the diagram - it will not remove items that were already on the diagram that were not retrieved from the server.
Re-creating a diagram from the repository contents
You can create a new diagram based on the model information previously stored in the EVA Netmodeler repository. To
do this, prepare a new blank diagram in Visio as described in the Visual Modeler Administration section.
Make sure that the active stencil has a master item for each of the types included in the model. Any model
items retrieved from EVA Netmodeler that do not have a corresponding master item in the current stencil will not be rendered in the model.
Select the GetModel option from the Macro menu. EVA Netmodeler
will return the items and their relationships from the repository to Visio, and Visio will use the master items in the stencil to draw the items on the diagram.

Troubleshooting
- New Masters are created in Visio when icons are dropped on the sheet
Check the check box under icon properties called "match master by name on drop" and make sure it has been
chosen. But now you would have to re-modify your model with the new properties.
- Getting back relations you have not created
By default, EVA Netmodeler returns all the relationships that are defined in the model type / stencil and that exist
between the types defined in the model type / stencil. Checking the "Retrieve Only Own Relationships" check box when getting an EVA Netmodeler model you will prevent this from happening.
- Error message in Visio when you send a model to EVA Netmodeler (refer to the Visual Modeler Administration section for details on how to configure the Visio client and diagrams correctly)
- Make sure you have pasted in the correct VB code in to your Visio file.
- Make sure that all the items in your model are associated with a master.
- Make sure that your copy of Visio has been configured to allow macros to update themselves.

|